Un cannon à TNT est un dispositif utilisant de la TNT pour lancer un projectile comme un joueur ou une autre TNT.
Composantes principales[]
- Base en pierre (en cas d'accident, l'obsidienne est préférable)
- Système de redstone
- Pour l'allumage;
- Système optionnel (ex.: Choisir le nombre de projectiles, la force de tir, la direction... etc.)
- Une charge
- Un projectile (doit être une entité (ex.: Vous, un minecart, un mob, etc.))
- Un canal d'eau
Concepts de base[]
- La charge est un certain nombre de TNT servant à propulser le projectile
- La charge doit être dans l'eau lors de l'activation sinon le cannon s'auto-détruira.
- Pour être sûr de bien tirer (et éviter de détruire votre cannon), vous devez vous assurer que la charge s'active avant le projectile. La charge doit être dans l'eau, mais le projectile non. Ainsi, le projectile sera tiré, et, une fois le temps écoulé, détruira les blocs adjacents et blessera les créatures/joueurs à proximité.
- De la poudre de redstone est utilisée pour activer tous les TNT de la charge simultanément, sauf pour la "charge condensatrice" si le canon en possède une, dont nous parlerons dans la section appropriée.
- Pour une portée maximum, il faut que vous ayez un angle d'environ 30° mais avec le moins de blocs possible entre la charge et le projectile.
- Il est possible de surélever le canon à TNT du sol suivant la distance de tir voulue .
- Si vous fabriquez un Canon à Flèches, vous devez les "lâcher" grâce à un piston avant l'explosion.
Voici un lien pour le tutoriel de confection : ( http://www.youtube.com/watch?v=UKyqOa8UALQ ).
Noms[]
Il y a deux types de noms de canons : Le « Nom commun » qui donne une image de ce que le canon peut faire et comment le construire facilement. Le « Nom technique » donne des spécificités du canon, comme le nombre de délai des répéteurs de redstone.
Common Names[]
The common name of a TNT cannon is a short numerical description followed by the cannon's nickname. It is useful for comparison of two cannons and gives the reader an idea of what the cannon can do at a glance.
The common name of a cannon consists of five parts: the Damage Value(DV), the Ergonomic Value(EV), the TNT Amount(TA), the Maximum Range(MR), and the Nickname. They appear in this order:
<DV>.<EV>:<TA>.<MR> <Nickname>
Example: 40.86:8.104 Basic
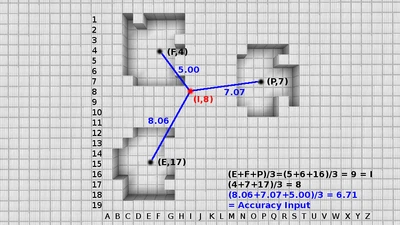
Damage Values show how "good" a cannon is, the higher the value, the better it is. (usually not accurate for specialized cannons)It is calculated as the average of three values, dubbed "Accuracy","Power", and "Speed". The accuracy value is calculated from the accuracy input, which is the average of the distances from the explosions generated in the shots to the average of the positions of the explosions aforementioned.
In the image to the right, the accuracy input is the average of the lengths of the blue lines. The red dot is the average of the positions of the explosions, and an endpoint of each of the blue lines, the others being the explosions. The accuracy value equation is (45-A)*2, where "A" is the accuracy input. The power value is much simpler to calculate; it's the number of TNT in the shot times ten. The speed input is the distance between the front of the cannon to the average position of the centers of the explosions. The speed value equation is S/5, where "S" is the speed input. The Damage Value is generally below 100, and to calculate it all at once use this equation: (((45-A)*2)+(T*10)+(R/5))/3=40 .
Ergonomic Value tells how hard a cannon is to build, higher values signifying easier build. It is the average of the construction, redstone, and TNT values. The construction input is an estimate of the number of blocks in the cannon, excluding fire, water, air, and TNT.The construction value is (1000-B)/10, assuming "B" is the construction input. The redstone value is ten minus an estimate from one to ten of the complexity of the redstone, times ten; (10-R)*10, where "R" is the estimate. The TNT value is (50-T)*2, and "T" is the number of TNT needed to operate the cannon at maximum capacity. The whole equation to calculate the EV is stated here: EV=((1000-B)/10+((10-R)*10)+((50-T)*2))/3
TNT Amount, Maximum Range, and Nickname are pretty self-explanitory, but to clarify, the TA is the same as the TNT value of the EV, and the MR is the distance from the front of the cannon to the farthest explosion. The nickname is whatever you name it, assuming it's not profane, and nobody else has already named a similar cannon.
As an example I will show how the 40.86:8.104 Basic was named. (See Image) (((45-0{Accuracy Input})*2)+(1{Power Input}*10)+(104{Speed Input}/5))/3=40<DV> . (((1000-50{Construction Input})/10+((10-2{Redstone Complexity})*10)+((50-8{TNT Used})*2))/3=86<EV>:8<TA>.104<MR> Basic<Nickname>
Technical Names[]
A cannon's technical name should give those who read it a complete picture of its function, use, and method of operation. While it is impossible to anticipate every innovation in TNT Cannon technology, most cannons will benefit from using these standards in their technical names.
- The first number in a technical TNT cannon name designates how many vertical rows of TNT it has for the charge. The example cannon has 1.
- The next number is the amount of shot TNT, or Shot the TNT cannon has. Again, the example cannon has 1.
- Next, the number designates how many charge blocks of TNT the cannon has.
- After that, you list how many repeaters there are, and how much they are set to. E.g. If you have 10 repeaters set to 4, (which by the way is the max setting) you would list R4.10. If there are no repeaters, you would write an M for manual.
- If there is a condensation system, after you wrote the charge number, write a decimal point, then the amount of condensation charge TNT. If there is no TNT, write 0 instead of a condensation number.
- The mounting block is designated by a code, 0 for no block, 1 for no block, 2 for full block, 3 for slab, 4 for ladder, glass pane, or iron bar, 5 for trapdoor, 6 for fence post and pressure plate, 7 for piston.
- If the cannon does something special, like shoot vertically, or does a spread shot, write that after the mounting block code.
- Then, of course, the nickname of the cannon goes here.
The featured TNT cannon below would be named 114.0R4.4MB2
Building materials[]
Survival Mode[]
As discussed in basic concepts, there are many parts of a TNT cannon. This section will show you what you need to build them.
1. Body
- In SMP, where cannons are most used, the body should be an available material, but should not be totally un-blast resistant. If you are firing at another cannon, the blast resistance of the material is a must. (For more on TNT cannon defenses, look below)
- Another factor is visibility, which is one commonly overlooked. When making a cannon out of obsidian, it is hard to see redstone, and that can lead to fatal errors. On the other end, when setting up an ambush in the jungle, it is best not to make your cannon out of orange wool or lapis.
2. Wiring
- There are two main sets of wiring in a cannon, the charge wiring which activates the charge, and the shot wiring that activates the shot. Without any repeaters, which can be hard to get, a cannon is designated as manual, with 2 redstone power sources/blocks, such as buttons. For a manual cannon, the materials are simple, just a redstone wire that connects the charge to a redstone emitting item, and a wire that connects the shot to a redstone power source. However, this requires skill so as not to misfire, you must know when to activate each button.
With repeaters it is a different story. The maximum amount of time between the charge activating and the shot activating is ten repeaters set to 4. That will also bring you maximum range, will only require one redstone power source, and will require no skill to fire correctly.
3. Mounting Block
- Mounting blocks (described below) are only certain special blocks.
4. Explosion Housing
- Unless its a dry cannon, this must be water.
For cannon practice against player and stationary targets in the heat of the battle, try the server pvp.oc.tc on maps like shroom trip and medieval warfare.
Creative Mode[]
In creative mode, there is no reason to build a TNT cannon for warfare, but is the optimal mode for testing and developing cannons.
Limitations, and ways to Possibly get around them[]
- The two big, main limits to TNT cannon engineering are 1. That no matter what you do, a TNT will explode approx. 4 seconds or 8 flashes after being primed. The way to sidestep this is to make the TNT fly faster, but that leads us to limit 2. Minecraft can only take so much, and Entities flying at escape velocity around your Minecraft world can cause it to crash. Another thing that can cause crashes of your Minecraft is large amounts of impulse charges detonating in unison. With the allotted 1.5 GB of RAM, the max TNT is about 500. The way to possibly sidestep is to increase the RAM allowed for Minecraft, if that is even possible for certain computers. Limit 3. Is that TNT has a 7 block detonation radius, so just making a large cannon is a waste of time. Beyond 9 charges, the TNT is wasted. However, this can be sidestepped by either adding more vertical rows of charge to your cannon, adding a condensation charge system to your cannon, or a combination of them both. Limit 4 is for vertical cannons, and is that if you make it too powerful, it will fly up too fast and far meaning it will crash your game. This can be sidestepped by decreasing the power of said cannon, or making it semi-vertical. That way you can go up and sideways.
Cannon Sizes and Special Features[]
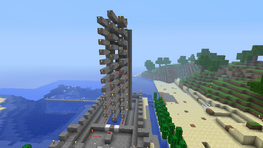
An example of a super large cannon
The default definition of cannon size is how many TNT are in the shot or how far it fires. If you are talking about compact cannons, you might be talking about literally the size of the cannon (e.g. How much space it takes up) or if you are talking about cannons meant for mass destruction, you might be talking about the size of the shot. But usually, people mean charge mass. A small cannon, such as a 112.0MM3 Ironwall Anti-Infantry cannon, only has a very small range, and is meant for stopping large amounts of rushing players or mobs (tons of wolves) A medium cannon, such as the 116.0R4.6M2 Scorpion is meant for setting up as a first line seiger, to be set up and aimed at a target such as supplies or a wall while one has arrow cover, or to be set up as an Anti-Archer cannon. A large cannon, such as the 119.0R4.10M3 Orion is for attacking from a distance, a borderline long range mortar, an Anti-Cannon defense, a second line seiger, and many other uses such as modding for Icarus ammo or a full lobaiming cannon. A sniper cannon, such as the 119.3R4.10M6 Ares, succesor to the Orion, is for a tent line seiger, setting up to shell opponents camp when they can't even see the cannon shelling them, and other über long range tasks such as that. And of course, mass demo cannons, such as the 187.0MM6 Spread Shot Devastator*, which is used to completely mutilate any defenses whatsoever.
Players also like to add features to their cannons including:
- Multiple shots [1]
- Semi-automatic/fully-automatic firing and reloading
- Condenser Charge (Another piece of TNT that explodes, pushing the Charge towards the front of the cannon to concentrate the blast.)
- Safety features
- Adjustable Shot Delay, which lets you change the range and trajectory of the cannon.
- Alternative Ammo [2]
- Dry Cannon: Building a cannon from explosion-resistant material to simplify design, maintenance, and potentially improve firing distance (dry cannons fire farther than their wet counterparts, all other factors being the same). See Tutorials/Dry cannon for construction details.
- Arrows as ammo
- Cannons that fire in a special direction, such as up or diagonly.
- Aimable cannons.
- Spread shot/mass destruction cannons
- Cannons with a blast shield (Even though the TNT is submerged and does not make a crater upon detonation, the player still takes damage).
- Shotgun-like Charges
Charge Condensing[]
TNT-Based Condensing (a.k.a., Condenser Charge)[]
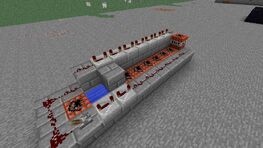
An example cannon with a Condenser Charge.
Because the pushing force of an explosion decreases as it gets farther from the source, TNT placed 7 blocks or more from the projectile would be have little to no effect. To remedy this problem a Condenser Charge may be used.
Condenser charges work by exploding slightly before the main charge, pushing the other primed TNTs towards the projectile.
Using a Condenser charge can increase the range of a TNT cannon by 33%. TNT condensation is still a relatively new innovation in TNT cannon technology, so this is not nearly complete.
Double-Condenser-Charge[]
A newer invention is the double condenser charge. As closer TNT to the shot increases in effectiveness ( for example 1 block from shot = 200 blocks range 2 blocks from shot = 170 block range), however is harder to compact, so the only way for it to work is with the double condenser charge.
The way THIS charge works, is by dropping a second piece of TNT just behind the first charge, and as the first charge explodes, the second charge and the shot is condensed, and the second charge explodes 1-3 ticks later, condensing further, giving a 55% range boost.
The current design has been made compact by its creator, MINBLEMONE, and is available to put into any cannon, however cannons with multiple loads may require revised timings.
Piston-Based Condensing[]
Using pistons to push the Main Charge closer to the Shot also does the same thing as a Condenser Charge, more complicated to build but more controllable. To work, the Main Charge must be primed, turning the solid TNT blocks into entities. Once they are entities, a series of pistons can push and concentrated all charges into a single block space behind the Shot. In this system, you get far more efficient power from a given size of Charge.
Example: Cannon with 18 Block Piston Charge Concentrator This cannon uses a two rows of pistons at the sides and a double pistons in the middle to concentrate 18 blocks of TNT into one spot. The TNT Charges are set off when they are pushed beside the column of redstone torches by other pistons. They then fall into the water and are push by the side pistons, putting them in a single row down the middle of the water trough. Then, a double piston extends and pushes all the blocks forward into one spot behind the Shot.
Care must be taken so that the pistons do not displace the water blocks protecting the cannon from TNT damage. To do this, one usually has to apply water a block above the area where the pistons would go into. It is also advised that the pistons should RETRACT back into normal position before the Main Charge explodes, or your cannon might be destroyed. When the pistons extend, they create air spaces in the water no matter what, hence compromising the water's protection.
Guide Blocks[]
Since beta 1.7 (needs confirmation) When a TNT charge is primed, it will usually shift slightly to one side. This can make a previously great cannon inaccurate. This is true with many cannons; but the solution is simple. If you add a guide block to the cannon, so that there is a wall on either side of the TNT when it is primed, it will not shift left or right, making an otherwise straight shot diagonal. If your design does not allow for this, you could just make the guide blocks one block higher, instead of being on either side of the TNT this works because TNT will jump up, then go sideways in midair. Note that in most basic cannons, Guide blocks should be transparent if the TNT cannon automatically primes the Shot-otherwise, the redstone that ignites the Charge will power the block next to the Shot, and igniting the Shot as well. If this explanation is unclear, look at this diagram:
X = Guide block O = Shot
Figure: XOX
In dry cannons, a guide block is almost a necessity because dry cannons tend to be inaccurate. However, dry cannon's guides are for directing the shot to be shot accurately, not to be primed accurately. However, guides can also decrease range is they are too long. A link to Tutorials/Dry cannon
Shot Mounting Blocks[]
The shot mounting block for a cannon should be chosen according to how fast, far, and high you want the cannon to fire. Of course, these variables depend greatly on the position and amount of the charge and the timing of the shot, but the mounting block also can make a difference. For example, with a cannon with a charge of 5 and a delay of R4.3, the shot will take a mortar trajectory with a ladder more than with a fence post and pressure plate. A few things:
- Even though the shot mounting blocks ladder and full block are both the same height and fire a shot at the same trajectory, the ladder will consistently fire farther than the full block because the ladder has less matter in between the shot and the charge than the full block. This situation is the same for all mounting blocks, the slab and fence post w/ pressure plate also follow the same rule.
- There is a trade off: although the fence post and pressure plate fire the farthest, they are also expensive, while the slab is cheap and easy to get, as while as coming in many forms.
- The maximum range for any cannon can be achieved by altering the mounting block. A TNT shot will be fired farthest if it leaves the cannon at a 30 degree angle. So, if you want to just have your cannon go the farthest it can, use the slab, Fence and Pressure plate, or Trapdoor mounting blocks. However, when faced with fortifications or terrain obstacles, the best idea would be to have a mounting block like Piston, ladder, or single block that makes the TNT arc over the said obstacle. Then again, it is fun to blast your way through things...
- The following shot mounting blocks are tested and deemed safe. Feel free to experiment with mounting blocks, but keep in mind that some blocks, such as a lone pressure plate, will cause a mis fire of your cannon, and of course make it self destruct.
A rewrite for most of these mounting blocks is coming soon.
No Mounting Block[]
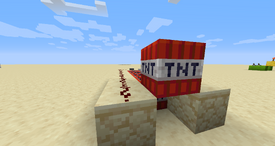
No Mounting Block
Pros: Highest velocity, simple, scalable
Cons: poor range in smaller cannons, downward trajectory, line-of-sight only
When no mounting block is used, the Shot is either allow to fall onto the water trough or is place on the trough directly. the Shot will fire out completely horizontal, or 0°. Gravity will quickly pulled the Shot to the ground, giving a very flat, downwards trajectory.
With small TNT charges, the range can be extremely limited. To increase the range, ever larger charges are needed or the cannon must be built higher above the ground. A larger charge means a higher velocity to the Shot, pushing the Shot farther away before it drops to the ground.
Players have been known to use up to 70 TNT charges and beyond. But economically, a cannon without a mounting block will take more TNT and longer to load for a certain range.
Single Block[]
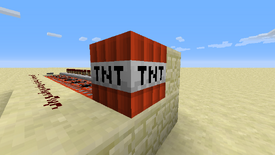
Single solid mounting block
Pros: Higher firing angle, can lob shots
Cons: Low velocity, reduced power and extremely poor range for smaller cannons
A single full size block such as cobblestone or obsidian is placed under the Shot. This has the effect of elevating the Shot above the water trough, so the blast force from the Charge is applied not just forward, but upwards. The shot is fired out at a high angle and trajectory. This is useful for hitting an elevated target, or one behind terrain or obstruction.
However, part of the blast force is absorbed by a solid mounting block, so the cannon will suffer similar problems of needing large charge sizes. Also, since some of the energy is expelled in the upwards direction, forward shot velocity is reduced greatly.
A better alternative to the single mounting block is using a Ladder instead.
Half Block[]
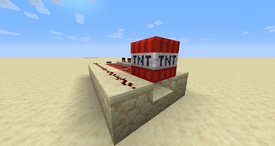
Stone Slab used as a half block mounting
Pros: Smooth trajectory (not too high, not too low), average velocity, more efficient for small and medium cannons
Cons: Slightly reduced power, not best for either straight OR lob shots, fuse range limit*
A half block is the compromise between a single block and no mounting, and generally more efficient than either. More of a cannon's blast force is directed forward, but there is still an upward vector that raises the angle of fire to roughly 30°. As with a single block, some of the blast energy is absorbed by the block, but much less. From the same TNT load, the half block has greater range than a single block or no block.
When the TNT Shot is initially placed over a half block, it will hang over the half block as if it was a full size block. Once the TNT has been "primed", it will fall down and sit on the true height of the half block.
The firing angle produced by a half block is good for extending the range of a cannon and hitting elevated targets, but its too low for effective lobbing over high walls and obstacles. For straight direct firing, shots fired with a half block mounting generally land level on the ground within a certain range. However, due to the limited fuse time of TNT in the game, scaling up the TNT charges up to a point will result in the shot flying too high and exploding in the air before it lands or reach the cannon's maximum range. This will be refer to as the "fuse range limit*". All cannons are limited by the fuse range limit, but cannons firing at higher angles are especially prone to the fuse limit, as the shot velocity is lower and shots reach higher altitudes.
Trap Door[]
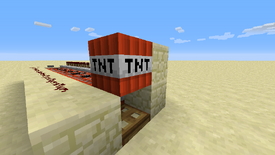
Trapdoor used as a mounting block
Pros: (closed) Optimized for flat trajectory, velocity almost the same as no-block, (opened) can be used in open position for higher firing angle, good scaling
Cons: Be sure that priming circuit doesn't activate the trapdoor by accident.
If the firing angle of the half block is too high for your purpose, a closed Trapdoor can be used instead. Like the half block, it provides some upward force to the shot by elevating it above the trough. A trapdoor, however, is only half the height of a half block. Firing angle is roughly 15-20°, making it extremely effective for straight shots at very long range (+180 block).
Little forward velocity is lost when firing, and shot typically fly out at very high speeds. This combine with the low firing angle means cannons firing larger loads can extend their range without encountering too much fuse range problems as with the half block or ladder mounting.
NOTE: Be sure that your priming circuit for the Shot doesn't activate the trapdoor, or open/closed the Trapdoor beforehand. (inapplicable as of 1.1)
Ladder/Iron Bars/Glass Pane[]
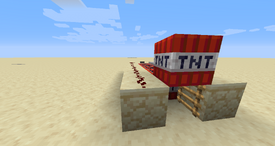
Ladder mounting block
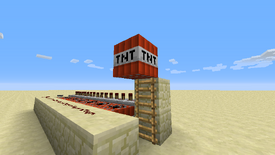
Shot mounting with two ladders
Pros: Efficient with small and medium cannons, High firing angle, parabolic trajectory, good for lobbing shots and high altitude
Cons: Low horizontal speed, poor scaling, limited range at ±120 blocks
A Ladder placed on the side can serve as a very effective mounting block for firing at high angles and lobbing shots. A primed Shot will be supported by the edge thickness of the ladder, preventing it from falling into the trough. Because a Ladder is not a full size block, none of the energy from the blast is absorbed, and the shot is propelled out at full force. By adding ladders above each other, different firing angles can be achieved. Typically, a single ladder will give an angle just higher than a half block, roughly 40°-45°. Two ladders will give an extremely parabolic flight, shots fly out at about 50°-60°.
A good portion of the blast energy is directed upwards on the block, so horizontal speeds are generally much slower than a no-mount or half block mount cannon. In return, the cannon has no problem lobbing shots over terrain and walls. At larger charge loads, shots can reach very high altitudes.
However, this also means the fuse range limit is an inherent problem with this mounting. Within a 100 block distance, well built cannons level with the ground can expect to land shots low enough to cause damage. But beyond this shots explode midair way beforehand, even with a shot primed at maximum fuse time with a delay circuit. Hence, one can't simply add more TNT to increase the range, as it will only make the shot fly higher. A basic solution is to put the cannon below ground, in a pit with a slanted slope to allow the shot to fly out. Since the shot had a lower starting point, it will explode closer to the ground once its fuse time runs out. To reach ranges beyond 150 blocks, this solution becomes impractical.
Fence and Pressure Plate[]
"Pros: Efficient with small and medium cannons, Low firing angle, good for shooting through caves and past overhanging base defenses. High velocity, extremely powerful in spread cannons and long range cannons.
"Cons: Expensive materials, can cause the cannon to self destruct if pressure plate is activated."
A fence placed at the end of the cannon tricks Minecraft to think that it is one block high, since it is only one and a half block high for the player's perspective. Therefore, the Charge would be recognized as closer to the Shot than it actually is. Since it gains more power and velocity, it appears to fly up a bit, then go down in an attack angle. This gives it a distinctive style of cannon shooting, and it is considered one of the most useful mounting blocks in Minecraft.
The only reason for the pressure plate at the end is for blocking the water. The pressure plate can be replaced by a sign. it works the same way but prevent accidentally activating the pressure plate and destroying the cannon.
Piston[]
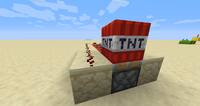
A Piston Mounting Block TNT cannon (primes after Piston extends)
"Pros: Adjustable, when fully extended it has the same effects of a full block but is more efficient than it and is more versatile, compatible with firing sand or gravel."
"Cons: Expensive, the shot has been subject to the fuse range delay limit found in arcing cannons, is used as a mortar MB so usage inside caves or buildings is not recommended and will result in short range shots, accidentally placing two TNT blocks (One on top of the other) will destroy the cannon, requires a R4.7 delay.
The three most common ways to use this Mounting block are 1. Prime the Shot then push it up 2. Push it up and then prime the shot and 3. Just use it as a more efficient version of the full block MB.
Cannon Tutorials[]
Short-Middle Range Cannons[]
Vertical TNT Cannon[]
This is a simple TNT cannon to rebuild. It is very efficient and shoots you very high in the air. click here for the tutorial
One-Button Defensively Ranged Cannon with a Repeater used as a delay[]
Is a simple cannon that has an automatic delay. Used mostly for guinea pigging other, larger, prototypical cannons or as wall mounted defense against ground- based troops or artillery. Tutorials/TNT Cannons/Building the 114.0R4.4MB2
One-Button Defensively Ranged Cannon with a Minecart used as delay[]
Once you press the redstone emitting item, first it activates the charge wiring, then sends a minecart around the cannon that triggers a detector rail, which primes the shot. Saves redstone, but takes a lot of iron (However, if you get rails from abandoned mineshafts this design can even save you resources!). http://m.youtube.com/watch?v=wA5bsZGGqqk
One-Button Defensively Ranged Cannon with a Dispenser used as delay[]
Once you press the redstone emitting item, first it activates the charge wiring, then shoots an item out of a dispenser that will slowly fall down through a pressure plate on a fence and burn. Saves redstone, and requires no repeaters for those survival cannon engineers, Over all, it's cheaper than the design above and normal automatic delay cannons with repeaters used as a delay. http://m.youtube.com/#/watch?client=mv-google&v=42qvgVsB9to&rdm=m5a60a4w6
Human (or other entity) launching cannon[]
Once this cannon is set up, then it can be used in order to launch entities onto other objects or areas of the map. It can be a little difficult however to get the entity inside the cannon, if it's something other than a human. http://www.youtube.com/watch?v=i3moNcatKC8
Vertical Launcher[]
This cannon, often called vertical launcher, other times called "Fireworks cannon" can be used to launch TNT blocks vertically, so that they can explode whilst midair. http://www.youtube.com/watch?v=xIZxG9nXeF8
Long Range Cannons[]
For long range cannons it is best to use a cannon with multiple rows of TNT for the charge, and depending on the elevation of your cannon, playing around with mounting blocks helps. If you add multiple shot TNT to your cannon, and play around with where you place the TNT in your cannon, then you can effectively destroy anything in the cannons path. A tutorial for such a cannon will be coming soon.
Automatic Cannons[]
Coming soon!
Specialized Cannons[]
Anti-Water Defense Cannon[]
It fuses sand and TNT together to blow up blocks covered with water. Water is the enemy of TNT cannons, and this one works around it. The link below shows the cannon at work and also a tutorial. http://www.youtube.com/watch?v=iSHDHlCBMVk&feature=plcp
Aimable T gun[]
This cannon is shaped like a T; the way it works is that it drops the shot in vertically on top of a slab between 2 smaller troughs that can be filled with TNT to change the shot's horizontal launch angle. You can adjust the range by not filling the main trough all the way. Great for putting in a castle to destroy enemy artillery!
Video examples[]
- Mortar High Angle Shot using a ladder mounting block.
- Compact The Shot is primed by hand, which must now be done with flint and steel.
- Superlarge Cannon Firing other Entities.
Trivia[]
- Most cannons are ineffective against water based defenses since TNT doesn't destroy any blocks when submerged. See the specialized cannon above.
- Cannons follow the South-West quirk and fire further when facing South or West. [3]
- TNT Cannons may be illegal on some Minecraft servers because of their extreme potential for mass destruction.
- TNT Cannon firing is the single most random event in minecraft, because of the thousands of different sample points taken to determine dozens(sometimes hundreds) of different vectors which are then added together to form the base trajectory of the Shot.
See also[]
- Tutorials/Dry cannon
